Docs Book a call
CogniVis AI

  • !Font Awesome Free v7.0.1 by @fontawesome - https://fontawesome.com License - https://fontawesome.com/license/free Copyright 2025 Fonticons, Inc.
    • Overview
    • Add Your LLM
    • Add Source
    • Define data sets
    • Generators
  • !Font Awesome Free v7.0.1 by @fontawesome - https://fontawesome.com License - https://fontawesome.com/license/free Copyright 2025 Fonticons, Inc.
    • Overview
    • Understand Permissions
    • Define roles
    • How to add a user
  • !Font Awesome Free v7.0.1 by @fontawesome - https://fontawesome.com License - https://fontawesome.com/license/free Copyright 2025 Fonticons, Inc.
    • Overview
    • Manage access
    • Organize content
    • Add attachments
    • Use shortcuts
    • Use templates
    • Embed content
    • Chat with AI
    • Ask AI
    • Edit AI
    • Search with AI
    • Generate AI covers
    • Export to CV documents
    • Create automated reports
    • Collect extension feedback
  • !Font Awesome Free v7.0.1 by @fontawesome - https://fontawesome.com License - https://fontawesome.com/license/free Copyright 2025 Fonticons, Inc.
    • Airtable
    • ClickUp
    • CogniVis Documentation
    • Confluence
    • Discourse
    • Document360
    • Dropbox
    • File
    • GitHub
    • GitLab
    • Gmail
    • Google Calendar
    • Google Drive
    • Google Sites
    • Google Storage
    • Guru
    • HubSpot
    • Jira
    • Linear
    • Loopio
    • MediaWiki
    • Notion
    • Oracle Storage
    • ProductBoard
    • R2
    • Request Tracker
    • S3
    • Salesforce
    • SharePoint
    • Slab
    • Slack
    • Teams
    • Web
    • Wikipedia
    • Zendesk
    • Zulip
  • !Font Awesome Free v7.0.1 by @fontawesome - https://fontawesome.com License - https://fontawesome.com/license/free Copyright 2025 Fonticons, Inc.
    • Overview
    • Define answer style
    • Choose LLM
    • Define Knowledge
    • Improve Search
    • Choose Time Zone
    • Add Starter Messages
    • ProfitRoom Tool
    • Image Generator
    • Code Interpretation Tool
    • Choose Who Can Access
  • !Font Awesome Free v7.0.1 by @fontawesome - https://fontawesome.com License - https://fontawesome.com/license/free Copyright 2025 Fonticons, Inc.
    • Overview
  • !Font Awesome Free v7.0.1 by @fontawesome - https://fontawesome.com License - https://fontawesome.com/license/free Copyright 2025 Fonticons, Inc.
    • Overview
    • Basic Setup
    • Choose Languages
    • Define Layout
    • Define Behavior
  • !Font Awesome Free v7.0.1 by @fontawesome - https://fontawesome.com License - https://fontawesome.com/license/free Copyright 2025 Fonticons, Inc.
  • !Font Awesome Free v7.0.1 by @fontawesome - https://fontawesome.com License - https://fontawesome.com/license/free Copyright 2025 Fonticons, Inc.
  • !Font Awesome Free v7.0.1 by @fontawesome - https://fontawesome.com License - https://fontawesome.com/license/free Copyright 2025 Fonticons, Inc.
  • !Font Awesome Free v7.0.1 by @fontawesome - https://fontawesome.com License - https://fontawesome.com/license/free Copyright 2025 Fonticons, Inc.
    • Basic setup
    • Installation
    • Booking
    • Google Maps
    • Kurzurlaub
    • Travelist
    • Tripadvisor
  • outlook
    • Basic setup
    • Installation
    • Get started
  • Thunderbird
    • Basic setup
    • Installation
    • Get started
  • !Font Awesome Free v7.0.1 by @fontawesome - https://fontawesome.com License - https://fontawesome.com/license/free Copyright 2025 Fonticons, Inc.
    • Overview
  • !Font Awesome Free v7.0.1 by @fontawesome - https://fontawesome.com License - https://fontawesome.com/license/free Copyright 2025 Fonticons, Inc.
  • !Font Awesome Free v7.0.1 by @fontawesome - https://fontawesome.com License - https://fontawesome.com/license/free Copyright 2025 Fonticons, Inc.
    • Simple Reminders
    • Page Change Tracking
    • Google Analytics Tracking
    • Search Console Tracking
    • Custom Sources
    • Google Analytics
    • Search Console
    • Chat Widget
    • Slack Bot
    • WhatsApp Bot

Generators are tools that help you quickly create specific types of content for different needs. Each generator is set up to produce a certain kind of text based on what you input, making content creation faster and easier.

CogniVis comes with premade generators to help you quickly create specific types of content for different needs—such as product descriptions, ad copy, blog sections, and customer responses.

In addition to these pre-made options, you can also create your own custom generators. This allows you to design tools that fit your unique content needs, making CogniVis a flexible solution for any kind of content creation.

How to create your own generators?

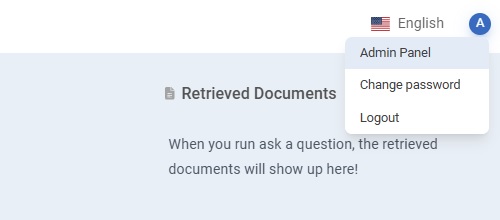
Go to an Admin Panel, which you can find in the upper right corner of the screen.

Go to the “Generator Builder” section in the menu on the left side of the screen.

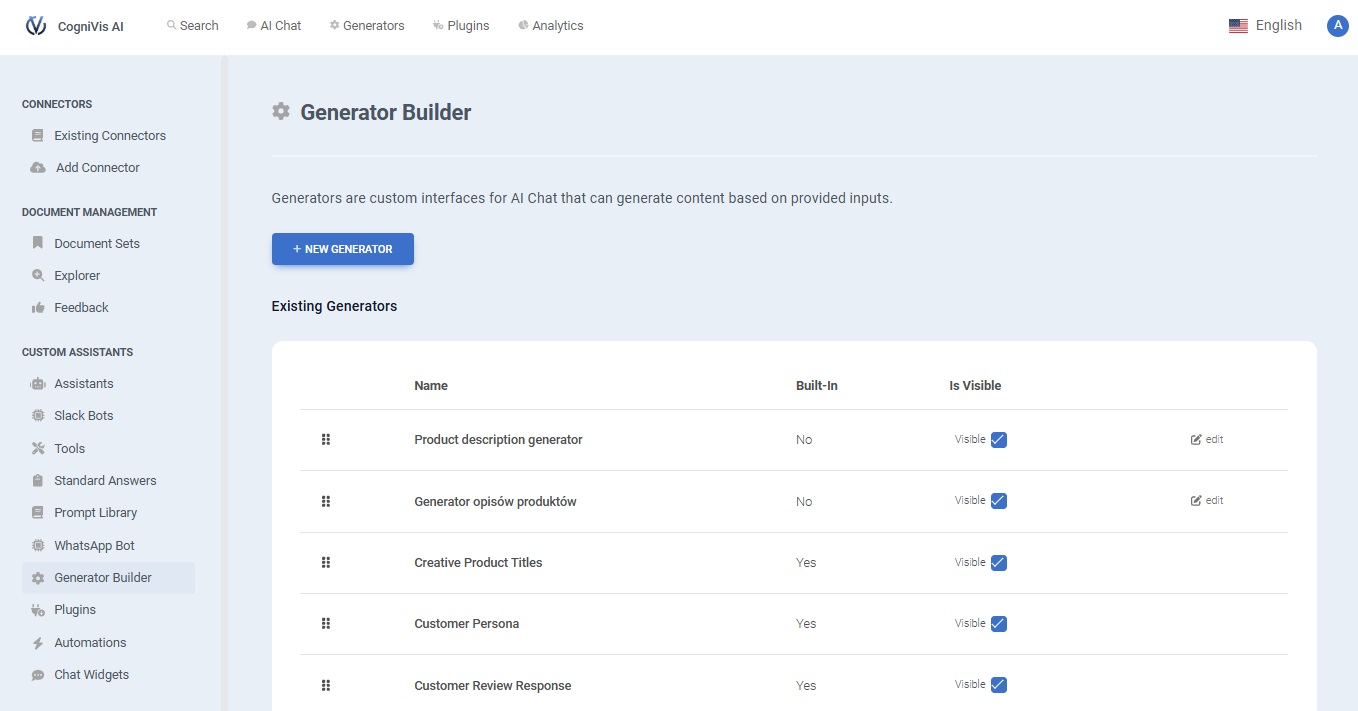
Select “New Generator”.

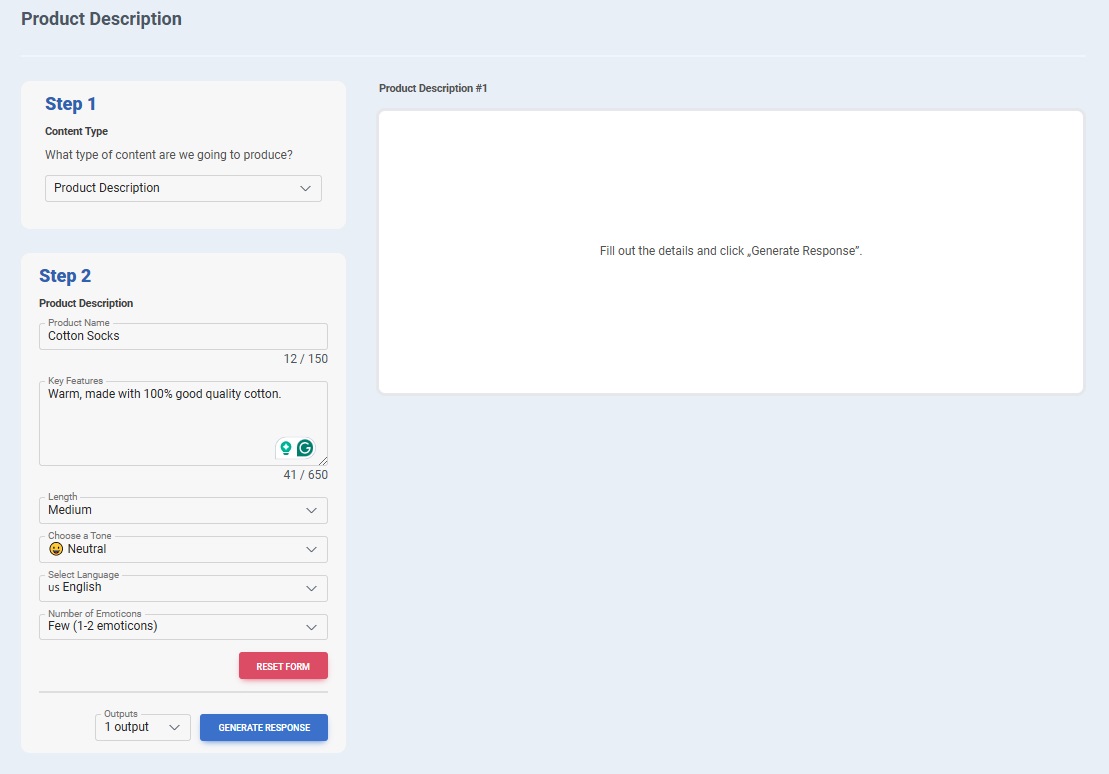
Set up the generator:
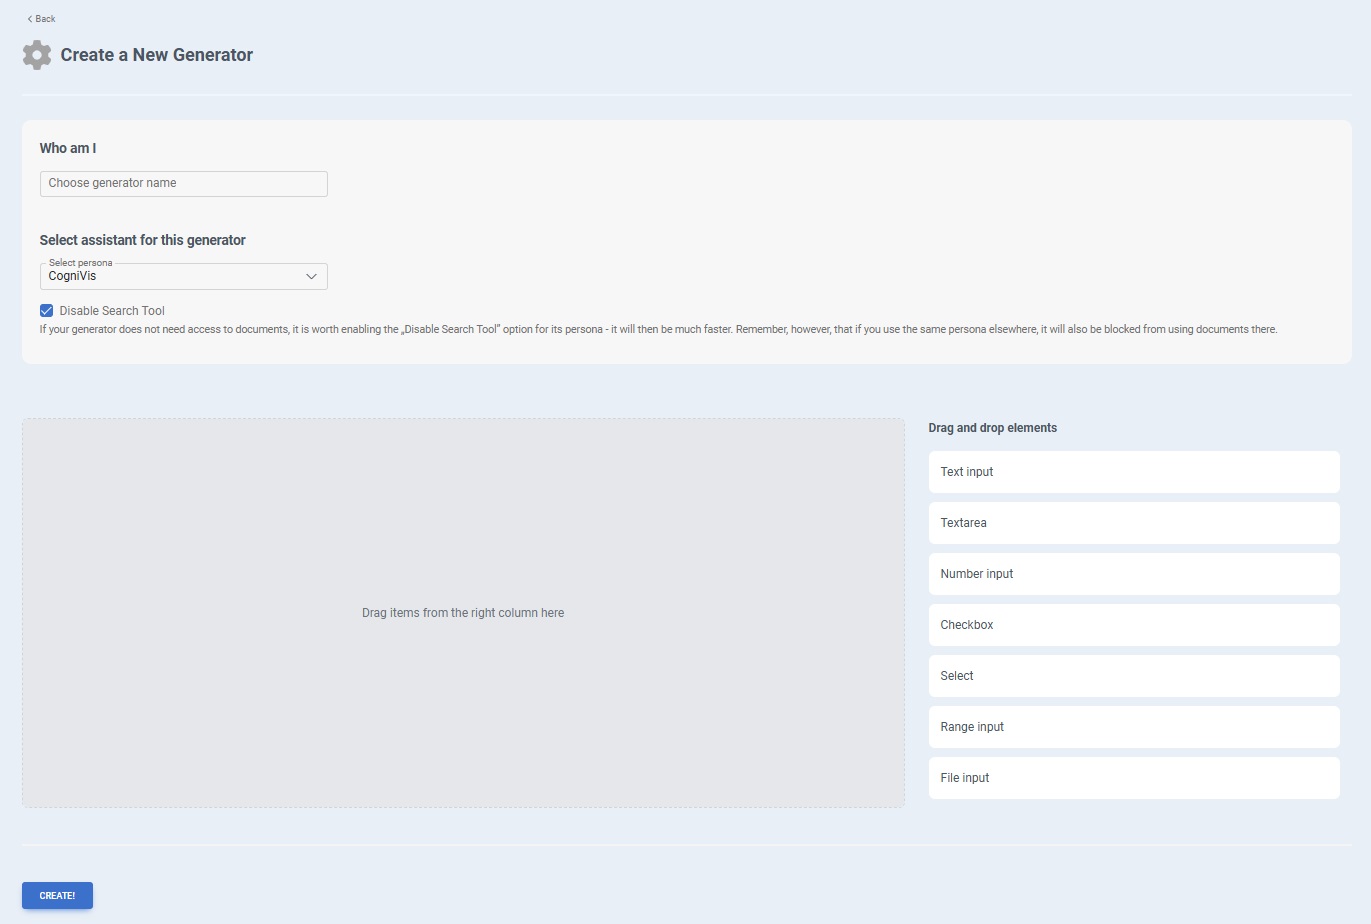
  • Choose a Name:
    • In the “Who am I” section, enter a name for your generator. This name should describe its purpose so you can easily identify it later.
  • Select an Assistant:
    • Choose the assistant or persona that will be responsible for generating the content. This allows you to tailor the generator’s responses based on the assistant’s specific style or expertise. Check the guide “How to create an assistant and how it works” if you need help with creating an assistant.
  • Disable Search Tool (Optional):
    • If your generator doesn’t need access to external documents or search features, check the "Disable Search Tool" option. This will improve the generator’s response speed.
  • Add Input Fields:
    • On the right side, you’ll see options for different input types, such as:
      • Text input: For short text entries
      • Text area: For longer text entries
      • Number input: For numeric values
      • Checkbox: For yes/no options
      • Select: For dropdown choices
      • Range input: For selecting a range (like a slider)
      • File input: For uploading files
    • Drag and drop the necessary input elements into the workspace on the left to customize how users will provide information to the generator.
  • Arrange and Customize Inputs:
    • Once the elements are added, you can arrange them and customize their labels or options to suit the purpose of your generator.
  • Create the Generator:
    • When everything is set up, click the CREATE button at the bottom to save and activate your new generator.

How to use generators?

You can find generators in the menu on the upper side of the screen. If you want to use any of the pre-made generators, or your previously made custom generator - this is the place.

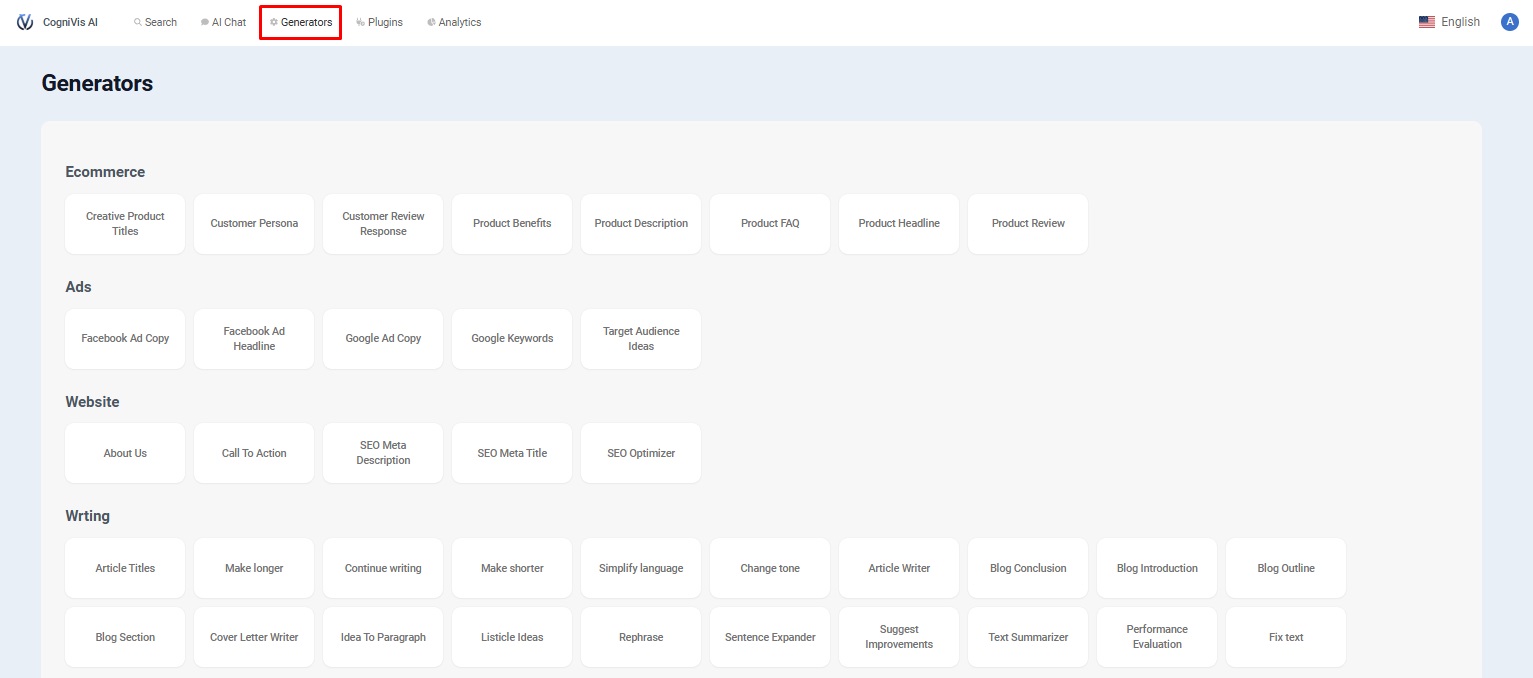
To use a generator, simply choose one from the list by clicking on it.

Each of the generators will have a different structure and information you can fill in. Just follow the instructions and click on “Generate response”.

You can choose how many responses you will get by modifying the output number in the dropdown list next to the “Generate response” button.

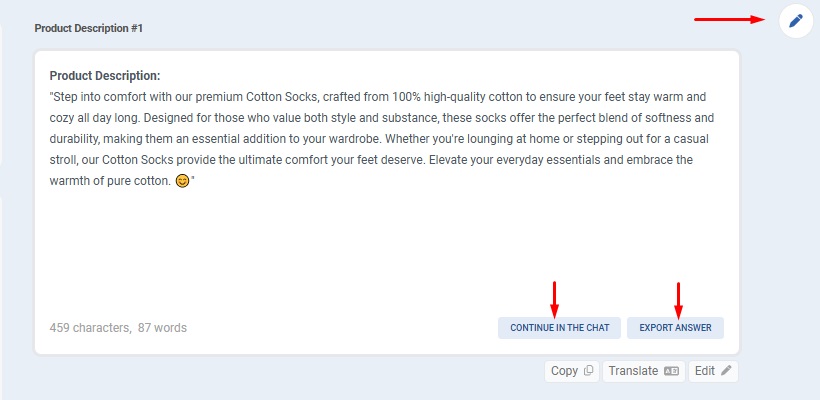
After getting an answer, you'll have options to:

  • Edit the response in a text editor.
  • Continue modifying the answer in an AI chat.
  • Export the answer.
  • Copy the answer.
  • Translate the answer.

You can also just keep modifying the information in the generator’s form and generating new answers.

  • How to create
  • How to use

CogniVis - AI knowledge base software CogniVis AI

Experts in AI creating solutions for the hospitality industry, private medical practices, and many others.

Find us

LinkedIn

  • Dawid Adach
  • Michał Szymański

YouTube Channel
Subscribe 52K

More

AI Training for Teams

Credits

Privacy Policy

Contact

Book a Call

Technical Support


CogniVis

Kijowska 7/49

03-738 Warsaw

support@cognivis.ai

© 2025 Copyright: CogniVis